Manual Information
A v2.0 guide covering timeline chord editing, section workflows, Arpeggio / Bassline generation, reharmonization, live accompaniment with Arranger Mode, and per-part MIDI output through the bundled ChordPart receiver.
| Item | Value |
|---|---|
| Product | Chord Dock (Lite / Extended / Performance) |
| Bundled plugins | Chord Dock (main) / ChordPart (receiver) |
| Plugin formats covered | VST3 / AAX / AU (ChordPart is VST3 only) |
| Applies to product version | v2.0.1 |
| Manual version | v2.0 |
| Last updated | 2026-07-14 |
1. Introduction
Chord Dock is a plugin for building, editing, auditioning, transforming, and exporting chord-based MIDI material within a DAW — and, in version 2.0, for performing accompaniment built on top of that chord progression.
Version 2.0 adds the following major elements:
- Arranger Mode: the core of the Performance edition. Build accompaniment patterns for four parts (Drums / Bass / Arp / Chord Pad) per section, then perform and queue them with pads as the song moves forward.
- Performance Page / Song Page: a dedicated screen to perform all four parts at a glance, and a screen to lay out patterns in song order.
- ChordPart (bundled receiver plugin): a small plugin that delivers per-part MIDI directly to separate DAW tracks. Even on DAWs that cannot split a plugin's MIDI output by channel (such as Ableton Live), you can drive any instrument — including the DAW's built-in instruments — for each part.
The main features carried over from earlier versions are:
- timeline-based chord progression editing
- section management and Focus Edit workflows
- chord palette editing
- Arpeggio / Bassline generation
- reharmonization with preview, comparison, and apply
- MIDI drag export for generated note material
This manual is intended for:
- Windows or macOS DAW users
- composers, arrangers, and producers working with chord-first workflows
- users who build MIDI clips first and assign instruments later
- users who want to build accompaniment quickly from a chord progression and perform it with pads
2. System Requirements
2.1 Supported Operating Systems
- Windows 10 or later (64-bit)
- macOS 10.15 or later (64-bit)
32-bit systems are not supported.
2.2 Supported Plugin Formats
- Windows: VST3 / AAX
- macOS: VST3 / AU / AAX
The bundled ChordPart is VST3 only on both Windows and macOS (there is no standalone version). Availability may differ depending on the distributed package.
2.3 Supported Hosts / DAWs
Chord Dock is designed for common VST3 / AU / AAX-compatible DAWs, including:
- Cubase / Nuendo
- Studio One
- Ableton Live
- Bitwig Studio
- Logic Pro
- Pro Tools
- Reaper
Host-specific behavior may differ. Per-part routing with ChordPart assumes the main plugin and ChordPart run inside the same DAW project (see Chapter 17).
3. Installation
3.1 Distribution Formats
The v2.0.1 packages are:
- Windows:
Chord_Dock_2.0.1_windows.zip, a ZIP bundle containing the user manual and related files. The plugin binaries areChord Dock.vst3andChordPart.vst3. - macOS:
Chord_Dock_2.0.1_mac.pkg, an installer package that installs both the main plugin and ChordPart.
On Windows, Chord Dock is distributed as a ZIP package rather than a dedicated installer. The ZIP may include the manual and other bundled documentation.
3.2 Before Installing
- Quit all DAWs before copying or installing files.
- For the Windows ZIP distribution, manually copy the
.vst3files into the VST3 folder. Copy bothChord Dock.vst3andChordPart.vst3. - If Chord Dock is already installed, updating it usually means replacing the existing plugin file with the newer one.
- Always update the main plugin and ChordPart together, as a matching-version set. If the versions differ, ChordPart stops for safety (see Chapter 17).
- Administrator permissions may be required.
3.3 Typical Install Locations
- Windows VST3:
C:\Program Files\Common Files\VST3\ - Windows AAX:
C:\Program Files\Common Files\Avid\Audio\Plug-Ins\ - macOS VST3:
/Library/Audio/Plug-Ins/VST3/ - macOS AU:
/Library/Audio/Plug-Ins/Components/ - macOS AAX:
/Library/Application Support/Avid/Audio/Plug-Ins/
For the Windows ZIP distribution, place Chord Dock.vst3 and ChordPart.vst3 in C:\Program Files\Common Files\VST3\.
3.4 Uninstall Policy
- On Windows ZIP installations, uninstall by removing the copied
.vst3files (both the main plugin and ChordPart). - On macOS, use a dedicated uninstaller if provided, or remove the plugin files manually.
4. Initial Setup in the DAW
4.1 Plugin Scan
If Chord Dock does not appear in your DAW:
- Confirm installation completed successfully.
- On Windows, confirm the
.vst3files were copied into the expected standard folder. - Run the DAW's plugin scan or rescan.
After scanning, both Chord Dock and ChordPart appear in your DAW's plugin list.
4.2 Basic Routing
Chord Dock is commonly used in one of these ways:
- as a MIDI-generating plugin routed into another instrument track
- as a planning and export tool that creates MIDI clips for later editing
Typical setup:
- Insert Chord Dock on a MIDI or instrument track.
- Insert a software instrument on another track.
- Route MIDI from Chord Dock to that instrument.
To distribute the four Arranger parts (Drums / Bass / Arp / Chord Pad) to multiple instruments, you have two options:
- Use the DAW's MIDI routing to split Chord Dock's output by channel (for DAWs with a channel filter).
- Use the bundled ChordPart to create a MIDI track entry point per part (for DAWs such as Ableton Live that cannot separate by channel — see Chapter 17).
4.3 Project Recall
Chord Dock state is generally restored with the DAW project. The same applies to Arranger patterns, pad assignments, and ChordPart settings.
5. Main Window Overview
The main window is organized into these areas:
- top toolbar
- timeline
- middle panel
- right-side panel
- chord palette
- keyboard bar
- optional helper windows such as Circle of Fifths, Arpeggio Note Edit, and the Reharmo Editor
When Arranger Mode is enabled, the lower area switches to a dedicated Arranger screen with three pages (Setup / Performance / Song — see Chapters 15 and 16).
6. Top Toolbar

The top toolbar contains controls that affect the plugin as a whole.
Common controls include:
- Undo / Redo
- meter change
- center / scroll helpers
- progression menu
- MIDI export
- degree view toggle
- timeline-only layout toggle
- section display controls
- internal audio toggle
- settings / license access
The exact button order or wording may vary slightly by build.
7. Timeline Editing
7.1 Chord Events
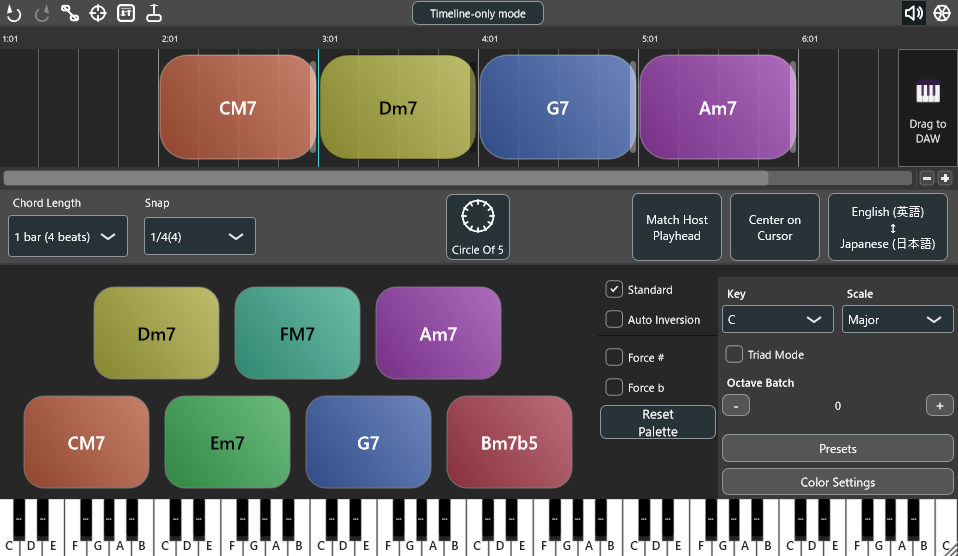
The timeline is the main chord editing area.
- chord blocks are arranged on the time axis
- drag to move a chord
- drag edges to resize
- click to place the cursor
- insertion follows the current snap setting
7.2 Meter Changes
Time signature changes can be placed from the ruler area. Chord Dock supports meter-aware timeline behavior and propagates that information into the Arpeggio, Reharmo, and Arranger views.
7.3 Timeline Context Editing
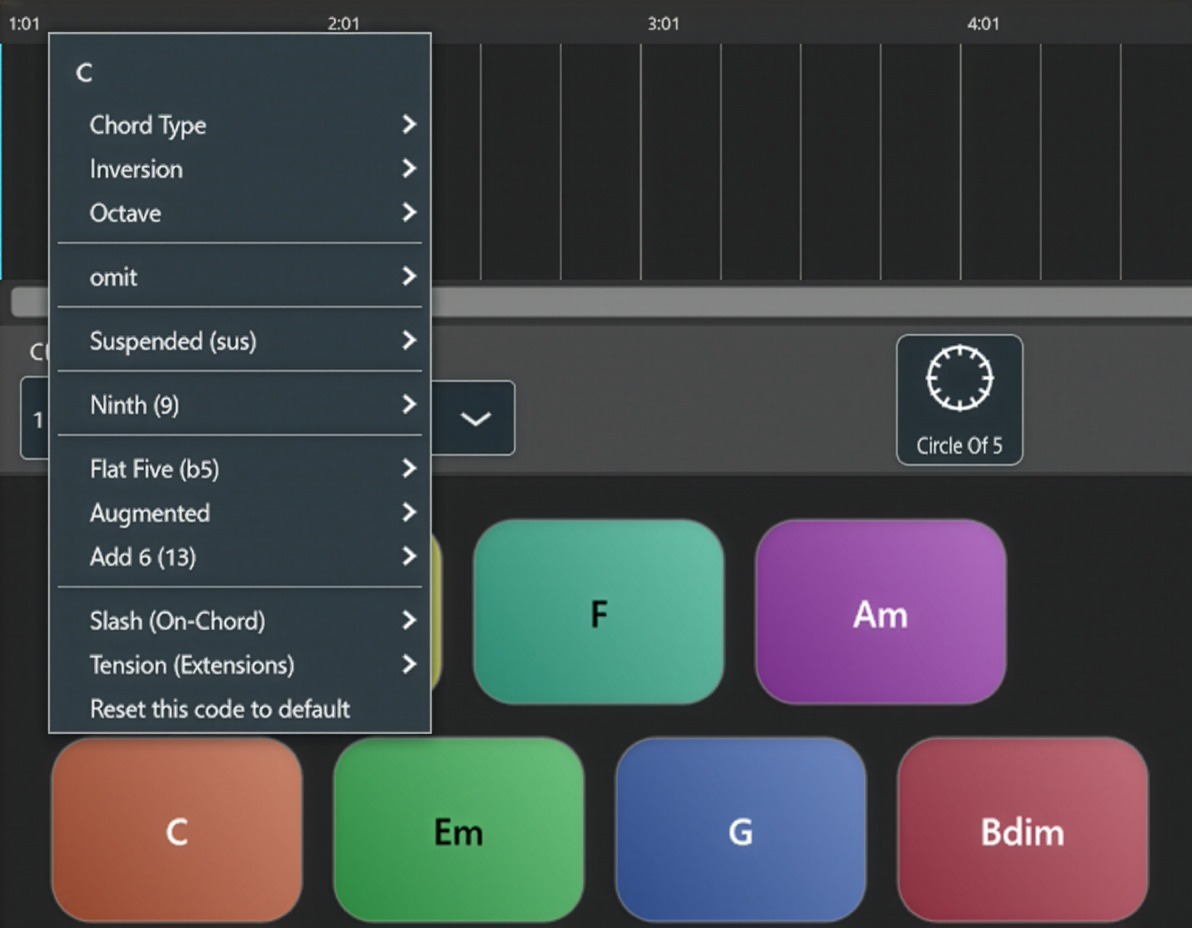
Chord events can be edited directly on the timeline through context menus. You can currently edit:
- chord type
- inversion
- octave
- slash chords
- chord modifiers
- tensions
Chord Modifiers is a submenu used for:
omitsus9thb5aug6th
These settings are independent from the chord palette state. What is shared is only the symbol and mask calculation logic, not the storage target.
8. Sections
8.1 What Sections Are
Sections group multiple chord events into a single named clip, such as a Verse, Chorus, or Bridge.
8.2 Creating a Section
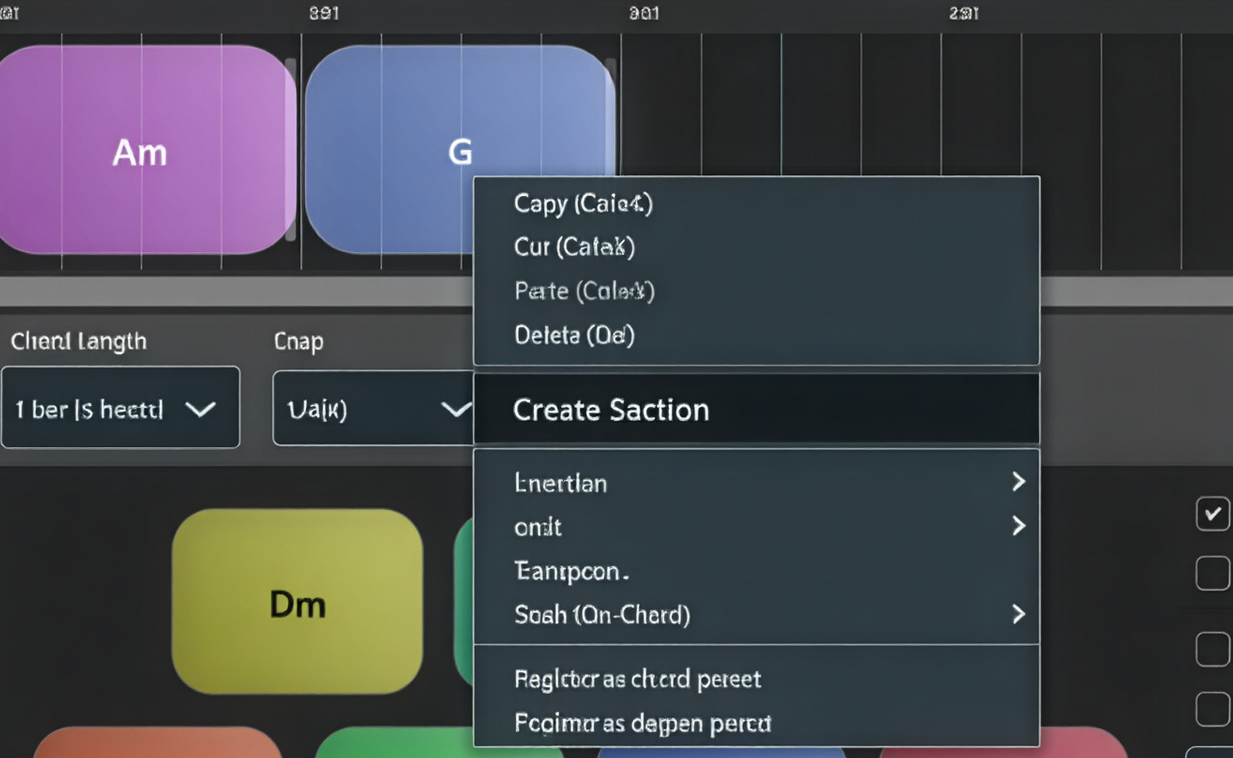
- Select multiple chord blocks on the timeline.
- Run the section creation command.
- Enter a section name and confirm.
8.3 Normal Mode
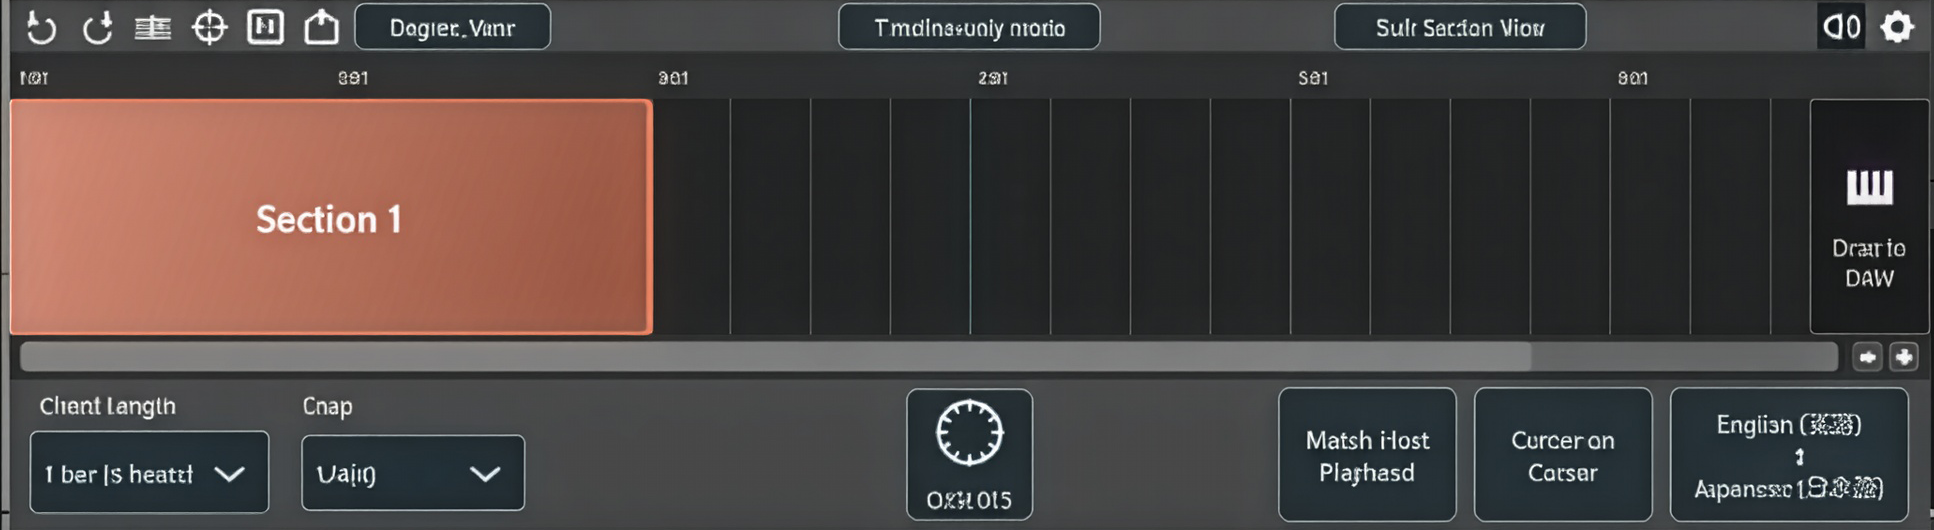
In normal mode:
- a section behaves like a single occupied block
- you can move or duplicate the section
- you can rename it, recolor it, or dissolve it
- you can reveal contents for reference without entering edit mode
8.4 Focus Edit Mode

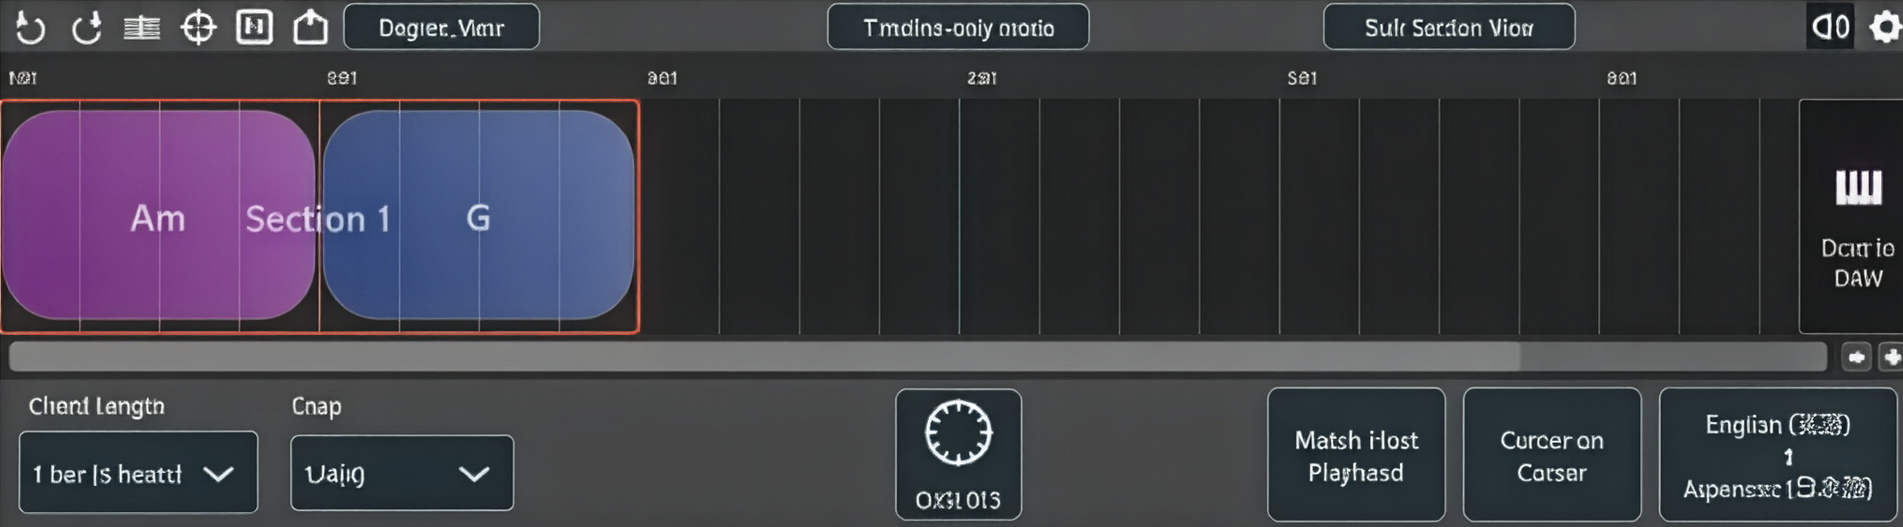
Double-click a section to enter Focus Edit Mode.
In this mode:
- only the selected section is editable
- outside areas are dimmed
- Esc exits focus mode
8.5 Sections and Performance Features
Arpeggio, Reharmo, and Arranger Mode all operate on the currently selected section.
Sections used for performance in Arranger Mode have an additional requirement:
- the section must start at a bar line and end at a bar line (the next downbeat)
- it must be at least one bar long
Sections that do not meet these conditions are still registered but treated as unusable in Arranger Mode, and appear grayed out in the Section Launcher. Align the section's start and end to bar boundaries on the timeline to make it usable.
9. Middle Panel

The middle panel groups timeline-related controls such as:
- chord insertion length
- snap / grid
- center-on-cursor / center-on-host
- language
- entry points for the Arpeggio, Reharmo, and Arranger modes
When you enter Arpeggio or Reharmo mode, some middle-panel controls are repurposed for that mode.
While Arranger Mode is active, the middle panel switches to a performance strip with items such as (see Chapters 15 and 16):
Arranger: turn Arranger Mode on / off- page switches:
Perform/Song MIDIchip: trigger input channelSync Modechip: Host / PluginLaunchchip: Launch QuantizeAutochip: section / pad auto advancePart Sendchip: send to ChordPart (Chapter 17)Current/Queuedcards: playing and reserved sectionRun Settingsmenu: a single window that gathers the aboveBack: return from Arranger Mode to the normal view
10. Chord Palette
The chord palette is the row of chord bubbles used to audition and insert chords based on the current key and scale.
Typical actions:
- single click: audition a chord
- double click: insert at the cursor
- right click: open the chord edit menu
Each chord bubble supports settings such as:
- chord quality
- inversion
- octave
- slash chord
- omit / sus / add9 / 9th-related handling / b5 / aug / 6th
- tensions
These settings are stored with the bubble itself and affect newly inserted timeline events.
11. Right-Side Panel
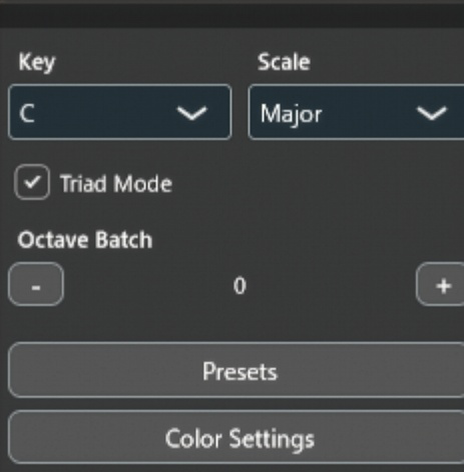
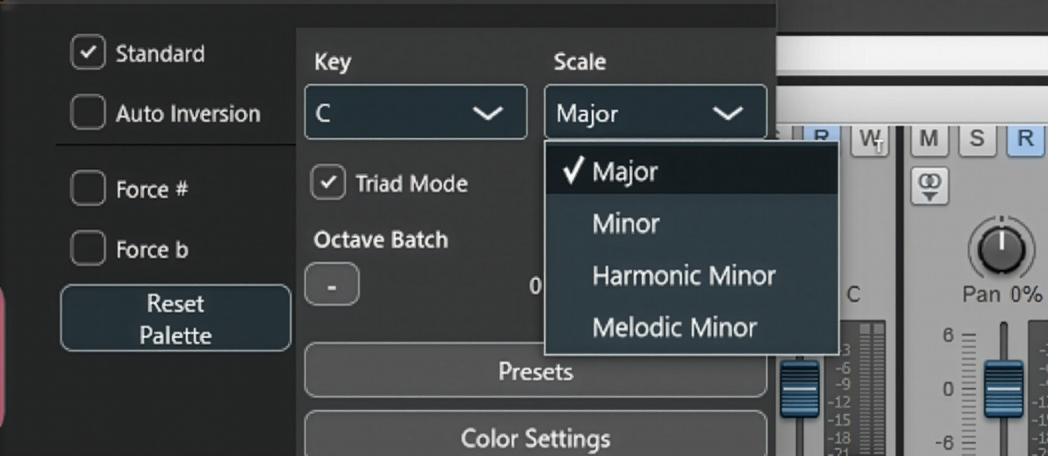
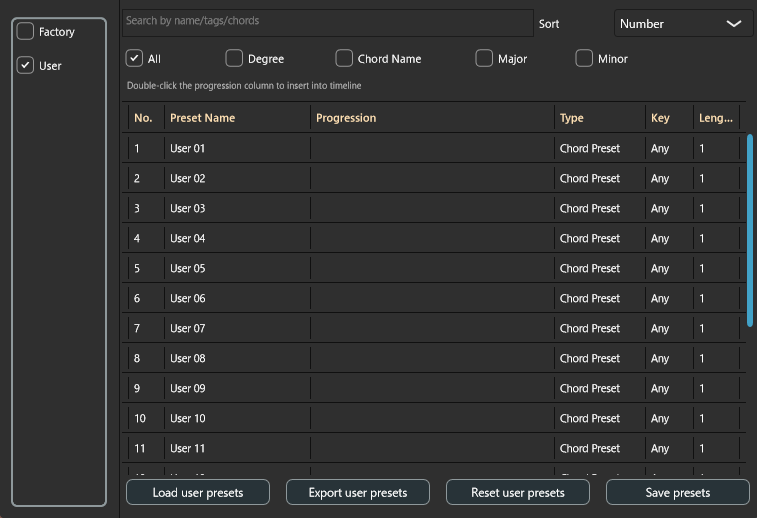
The right-side panel contains global harmonic controls.
Typical items include:
- Key
- Scale
- triad- or tetrad-oriented display behavior
- global octave offset
- progression presets
- color / theme controls
Changing key or scale updates the chord palette and Circle of Fifths view.
12. Circle of Fifths
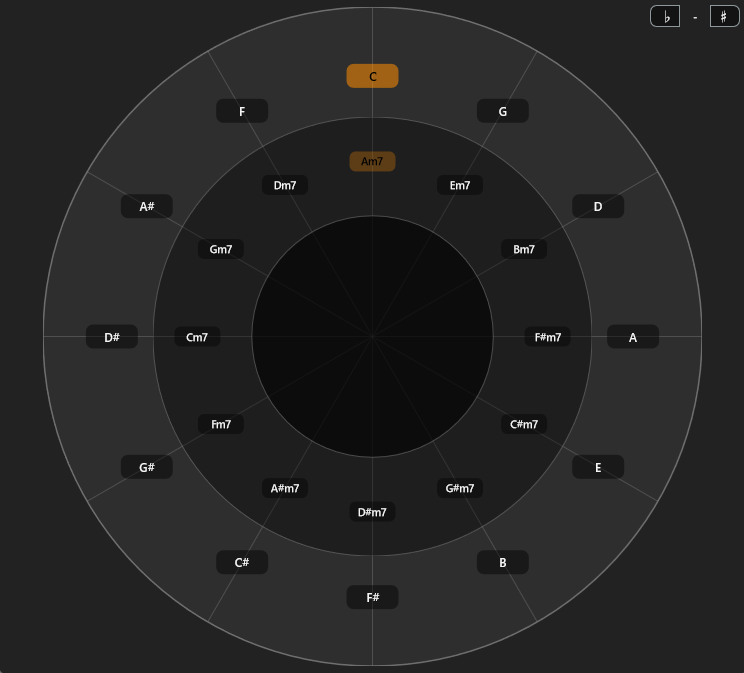
Edition: Extended (see Chapter 19)
The Circle of Fifths window is a helper view for harmonic overview.
You can use it to:
- inspect related chords visually
- understand tonal proximity
- reflect ideas back into the chord palette when needed
It is not used as a direct timeline placement area.
13. Arpeggio / Bassline
13.1 Overview
Edition: Extended / Performance (see Chapter 19)
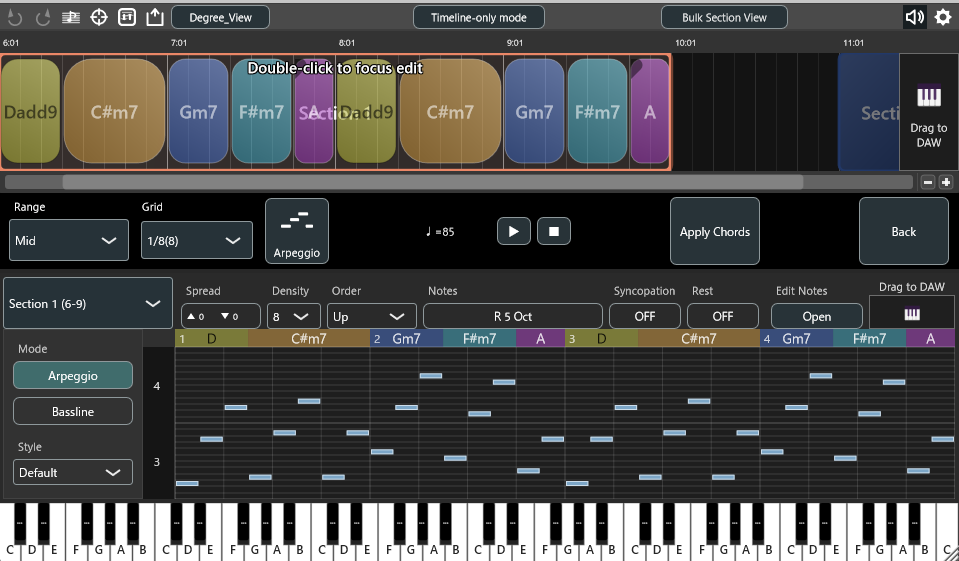
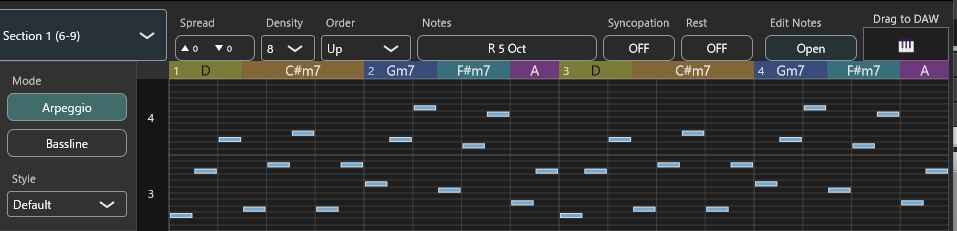
Arpeggio mode generates note events from the chord progression in the selected section.
It has two modes:
ArpeggioBassline
Both use the same underlying note-generation system, but differ in range handling, presets, and presentation.
13.2 Section Rules
- Arpeggio always works on the selected section
- the entire selected section is the target range
- sections longer than 16 bars cannot be loaded into Arpeggio mode
13.3 Main Parameters
Current Arpeggio parameters include:
Range/Spread/Density/Grid/Notes/Tension/Order/Syncopation/Rest/Style
13.4 Range and Spread
Range chooses the base pitch band. Spread Up and Spread Down widen the allowed pitch range above or below that base range.
Bassline mode uses a different low-end range table than standard Arpeggio mode.
13.5 Notes and Tensions
The Notes popup lets you choose pitch-role masks such as:
- Root / 2nd / 3rd / 4th / 5th / 6th / 7th / 9th / Octave
The Tension setting can be:
Off/On/Only
13.6 Order
Arpeggio mode exposes:
Up/Down/Up-Down/Random
Random is still deterministic. The same input produces the same result.
In Bassline mode, Order is hidden from the main UI.
13.7 Syncopation
Syncopation is a mask-based timing feature, not a humanize engine.
It supports:
- enable / disable
- bar mask / beat mask / sub-step mask
- direction:
AheadorBehind
Ahead shifts selected notes earlier according to the mask. Behind keeps the note start in place and extends the note length later.
13.8 Rest
Rest is also mask-based. It suppresses note generation at selected bars, beats, or sub-steps.
13.9 Styles
Current Arpeggio style presets:
- Default / Pulse 16 / Up-Down / Wide / Tight / Random Spark / Custom
Current Bassline style presets:
- Default / Root 1/4 / Octave Pulse / Walking / Syncopated / Drone / Custom
If the current parameter set does not exactly match a preset, the style display switches to Custom.
13.10 Note Edit Window
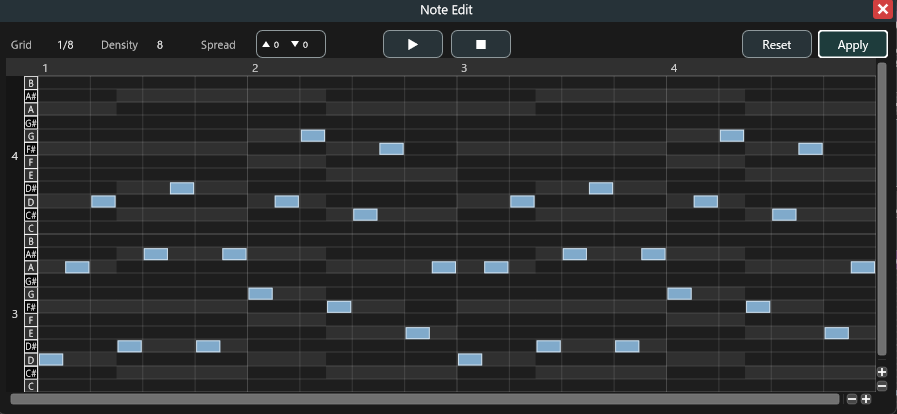
Arpeggio mode includes a note edit window for direct piano-roll editing.
You can:
- edit note timing and length
- zoom and scroll
- preview playback
- save edited notes
- reset to the regenerated notes
If you change parameters or apply another style, edited notes are cleared and the pattern is regenerated.
13.11 Drag Export
Generated Arpeggio or Bassline notes can be dragged directly into the DAW as MIDI.
14. Reharmonization
14.1 Overview
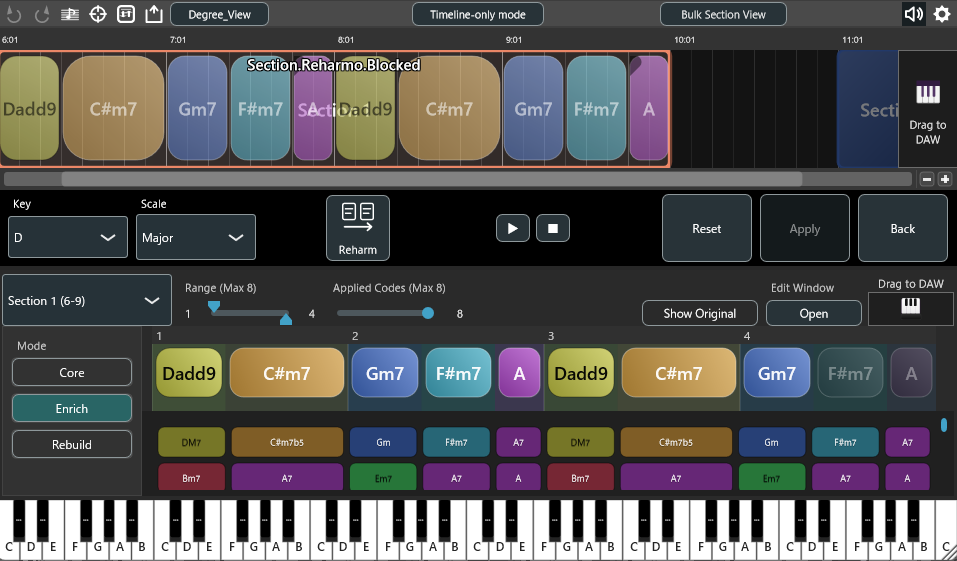
Edition: Extended (see Chapter 19)
Reharmonization mode is a section-based chord transformation workflow built around preview, comparison, and selective application.
14.2 Section Rules
- Reharmo works on the selected section
- the section itself may be up to 16 bars long
- inside that section, the active reharmo range may span up to 8 bars
- up to 8 target chords can be applied
14.3 Main Workflow
- Select a section.
- Choose a reharmo range within that section.
- Set
Applied Codes. - Choose
Core,Enrich, orRebuild. - Preview candidate rows.
- Lock chords if needed.
- Compare against
Show Original. - Confirm with
Apply.
14.4 Range and Applied Codes
- the range is selected with a two-handle slider
- maximum reharmo span is 8 bars
Applied Codesmeans the first N chord events inside the selected range- the maximum applied-code count is 8
14.5 Modes
Core: conservative; chord-level candidate handling; synchronous generation.
Enrich: adds color and expansion; supports both Chord Unit and Progression Unit.
Rebuild: more radical redesign; progression-oriented; T/S/D Fidelity is internally forced off.
14.6 Show Original
Show Original is not a variation mode. It is a comparison toggle.
- ON shows the original progression and preview notes derived from it
- OFF returns to the current reharmo preview
- applying while
Show Originalis active keeps the original progression and discards pending preview changes
14.7 Candidate Preview
Candidates are first applied to preview data, not directly to the timeline.
This means:
- the original timeline is not overwritten immediately
Applybecomes enabled only when a real preview change exists- split candidates can create two events from a single source event
- until you press
Apply, new candidate generation still uses the original target progression as its source - pending preview substitutions do not become the basis for recursive reharmonization before confirmation
14.8 Chord Locks
Reharmo supports locking individual target chords by persistent ID.
Locked chords:
- stay fixed during candidate recomputation
- preserve the current preview state for those positions
14.9 Edit Window
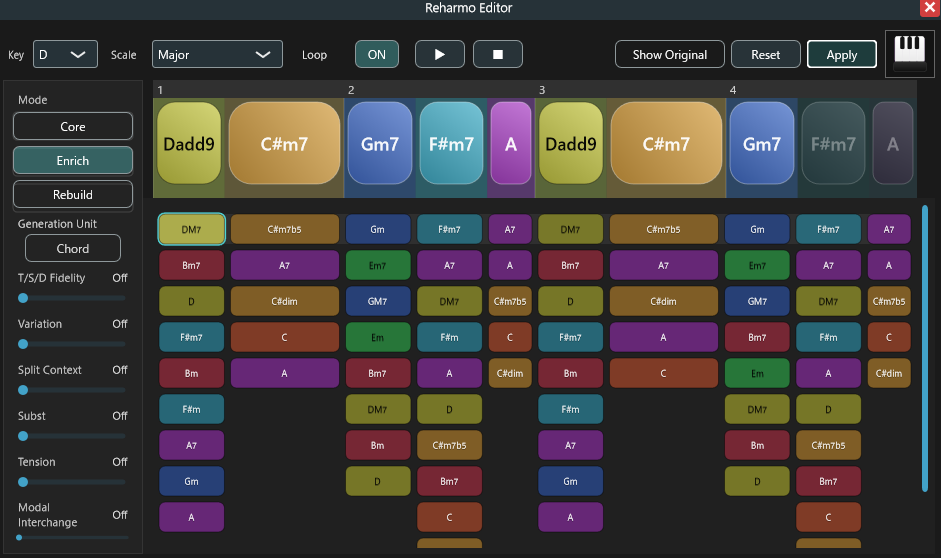
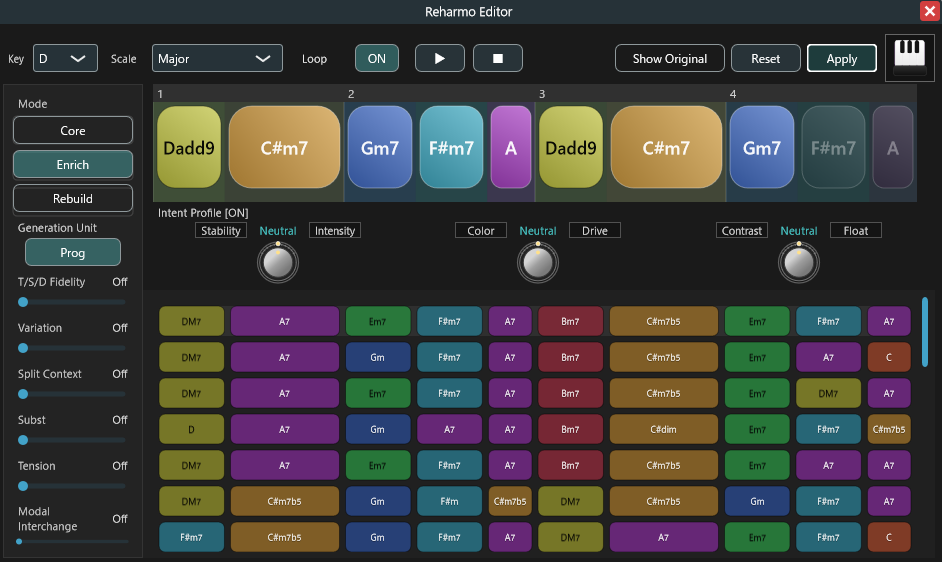
The Reharmo edit window provides detailed controls such as:
- Key / Scale display
- play / stop, save / reset
Show Original,Core / Enrich / Rebuild,Generation Unit- loop toggle,
T/S/D Fidelity, variation-related filters, intent controls - candidate explanation cards, seed information, mini timeline editing
Current playback behavior:
- starting DAW playback stops the Reharmo preview audio
- however, unapplied Reharmo preview chords remain visible in the edit window
- simply pressing play in the DAW does not revert a pending Reharmo preview back to the original progression
14.10 Apply and Undo
Applying Reharmo:
- asks for confirmation
- updates only the selected applied range
- may replace existing events or add split events
- rebuilds event notes
- records the change as
Reharmo Applyin the Undo history
15. Arranger Mode: Setup and Pattern Editing
15.1 Overview
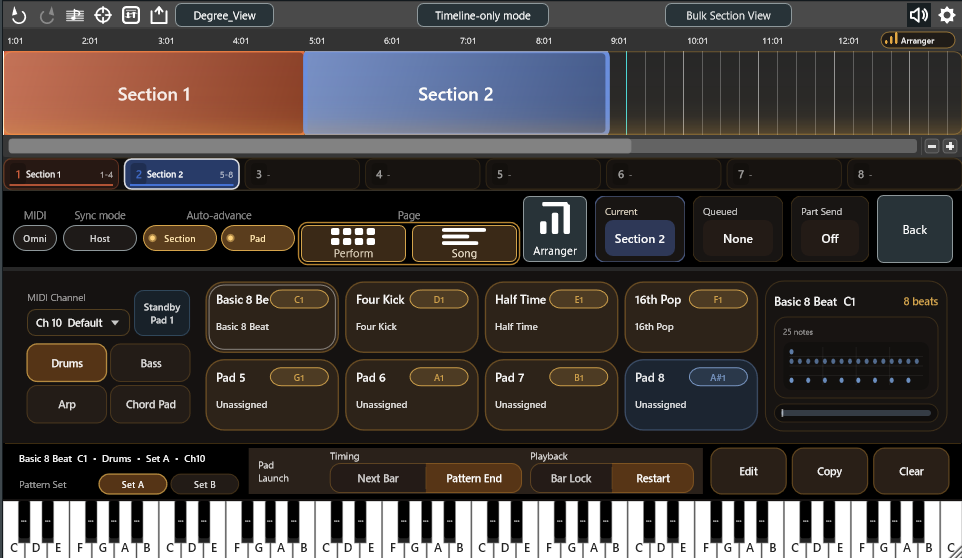
Edition: Performance (see Chapter 19)
Arranger Mode turns the chord progression on the timeline into performable accompaniment. Build accompaniment patterns for four parts (Drums / Bass / Arp / Chord Pad) per section, then call them up with pads as the song moves forward.
How pattern generation works
Arranger Mode is primarily a pattern-authoring system: you create and edit the accompaniment patterns yourself.
Arranger Mode does not use AI generation, cloud-based generation, or purely random playback. A pattern is a user-editable rhythmic and musical template stored on a pad. Presets and randomize commands only create starting points; you can then edit the result like any other pattern.
When Chord Dock previews, performs, or exports Bass / Arp / Chord Pad material, it reads the selected section's chord progression and converts the pattern's timing and chord roles into concrete MIDI notes. If you reuse the same pattern on a different chord progression, the rhythm and role choices stay the same while the resulting pitches follow the new chords.
The overall workflow:
- Build a chord progression on the timeline and group it into sections (Chapter 8).
- Turn Arranger Mode on.
- Create a pattern per part and assign it to a pad (this chapter).
- Perform with the Section Launcher and pads. Optionally arrange them in song order on the Song page (Chapter 16).
- Drag the finished patterns into the DAW as MIDI.
15.2 Editions and Demo
- Arranger Mode is a Performance edition feature.
- Editions without Performance, such as Lite and Extended, can still try the basics as Arranger Mode Demo (with limits, below).
- Performance / Full Bundle removes the limits, enabling all pads and MIDI export.
- Performing requires sections. A section must start on a bar line and end on a bar line (Section 8.5).
- If you select a section that does not meet the condition, you are prompted to align its start and end to bar boundaries.
What the demo lets you try
- open Arranger Mode and use the Setup / Performance / Song pages
- inspect and select sections, and operate the Section Launcher
- create, edit, preview, and randomize starting-point patterns on Pad 1–3 of each part
- place and play patterns on the Song page using Pad 1–3
Demo limits
- Actual playback time is capped at 90 seconds total. Only the time the Arranger is actually playing / outputting is counted; simply having the screen open or editing does not consume it.
- each part can use only Pad 1–Pad 3. Pad 4–Pad 8 are shown but cannot be used (this is by design, not a bug).
- Arranger MIDI export / drag export is not available.
- as the remaining time runs low, a warning appears (e.g.
Arranger Demo - 00:15 left), and when it reaches 0, Arranger playback, triggering, editing, and MIDI output are locked.
About the remaining demo time
- the remaining demo time is not saved with the project. Reopening the DAW project or re-inserting the plugin resets it to 90 seconds.
- existing data on Pad 4–8 is never deleted by the demo limit. Open in Performance / Full Bundle to use all pads.
15.3 Entering Arranger Mode and the Three Pages
Use the Arranger button in the middle panel to enter Arranger Mode. The lower area switches to a dedicated Arranger screen, and you can move between three pages:
- Setup page: manage parts and pads, and open pattern editing. This is the page shown right after Arranger turns on.
- Performance page: the play-oriented screen opened with
Perform. Shows 4 parts × 8 pads at once (Section 16.8). - Song page: the song-structure screen opened with
Song. Lay out patterns in song order (Section 16.9).
From each page you can return with the Back button or the Esc key. While Arranger Mode is active, the PC keyboard number keys 1–8 are mapped to the Section Launcher (Section 16.1).
15.4 Parts and MIDI Channels
Arranger Mode has four parts:
Drums: default Ch10. Uses fixed drum lanes mapped to MIDI notes.Bass: default Ch14. Can use chord-relative role patterns or an absolute-pitch MIDI roll, depending on the edit method.Arp: default Ch15. Uses chord-tone role patterns intended for broken-chord phrases.Chord Pad: default Ch16. Uses chord-tone role patterns intended for sustained or rhythmic chord voicings.
Each part's MIDI channel can be changed from MIDI Channel inside the pattern editor. Preview, drag export, and live playback all follow this setting.
There are two ways to drive each part with a different instrument:
- split by channel with the DAW's MIDI routing
- use the bundled ChordPart (Chapter 17). In this case, make sure the parts do not share the same channel
15.5 Pads and Pattern Sets
Each part has 8 pads. Pad 1–7 are the primary pads; Pad 8 is treated as an extra pad.
Each part also has a Pattern Set (Set A / Set B), so you can switch between 8 pads × 2 sets.
The selected pad's information appears in the Pad Inspector, where you can:
Edit: open the pattern editor in a separate window (creates a new pattern for an empty pad)Copy/Paste: duplicate a pattern between pads (with an overwrite confirmation)Clear: remove the pad's assignmentStop: stop that part's playbackSet to Standby: put the pad on standby silently
The same actions are available from the pad's right-click menu.
The Standby Pad 1 button puts Pad 1 of every part that has an assigned pattern on standby silently, all at once. Press it before starting DAW playback when you want the accompaniment to sound from the very first beat.
In the demo, each part can use only Pad 1–3 (Section 15.2). Pad 4–8 are shown but cannot be selected.
15.6 Common Pattern Editor Controls
Pattern editing is done in a separate window per part. Display and preview are based on the currently selected section.
Common settings and controls:
Pattern Name: the name shown on the padPreset: recall a style template (Section 15.10)Length: specified in beats. Patterns shorter than the section loop to follow alongGrid: snap / guide resolution (1/4, 1/8, 1/8T, 1/16, 1/16T, 1/32). Note lengths are preservedZoom/ horizontal scroll: edit long patterns without squashing them- Play / Stop: in-editor preview playback
Preview Loop: loop range is chosen from "section" or "pattern"MIDI Channel: this part's output channel (Section 15.4)
Basic grid-cell editing:
- click to place a note, left-drag to place continuously
- right-click to erase, right-drag to erase continuously
- drag a note's right edge to extend its length
- empty cell = rest, horizontal continuation = a longer note (there is no separate rest / tie row)
The upper area shows the section's chord ribbon and bar / beat guides, and follows meter changes.
15.7 Drums Editor
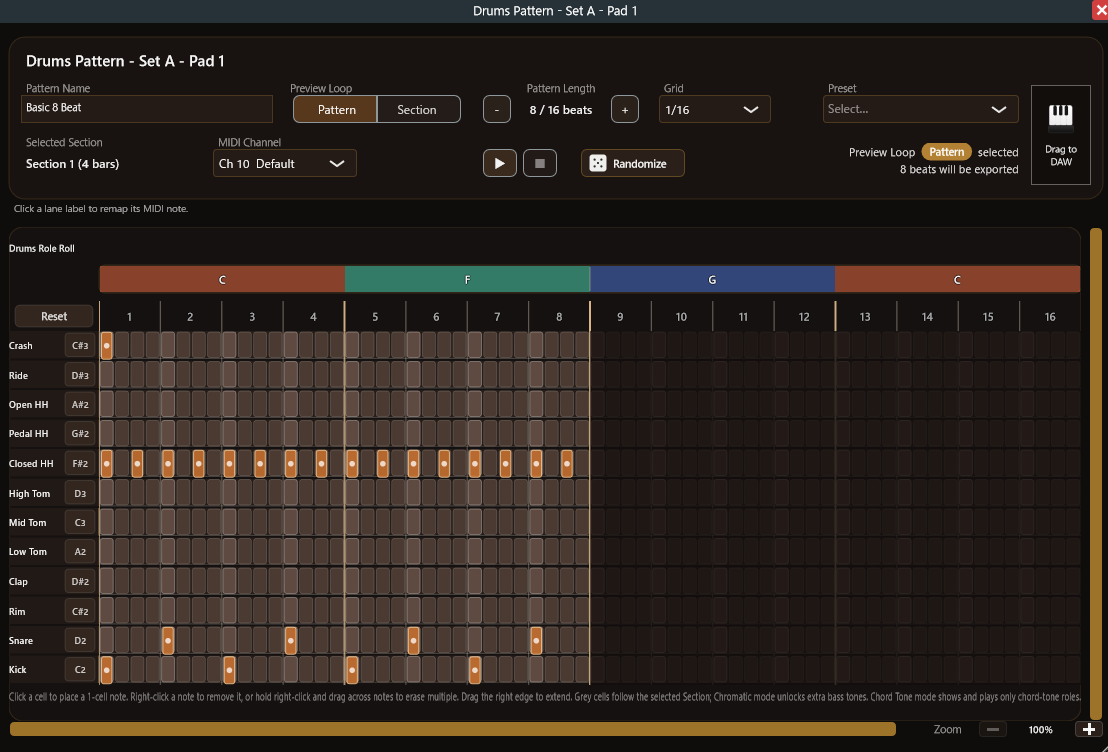
Drums is a lane-based step editor. Percussion lanes such as kick and snare are stacked vertically, and you build the pattern on a lane × grid layout.
- each lane maps to a MIDI note (initial values follow a GM layout)
- click a lane name to change that lane's MIDI note assignment
- use
Resetto return the note assignments to their defaults
If your drum instrument uses a mapping other than GM, adjust the lane assignments to match your instrument.
15.8 Bass Editor
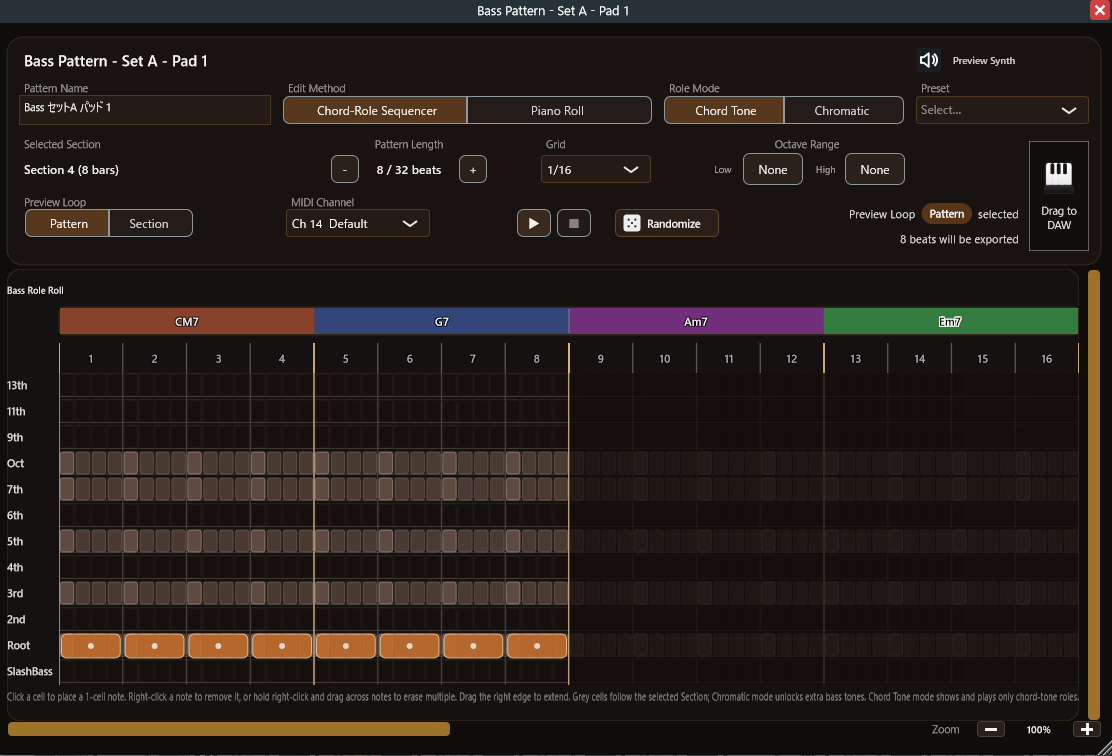
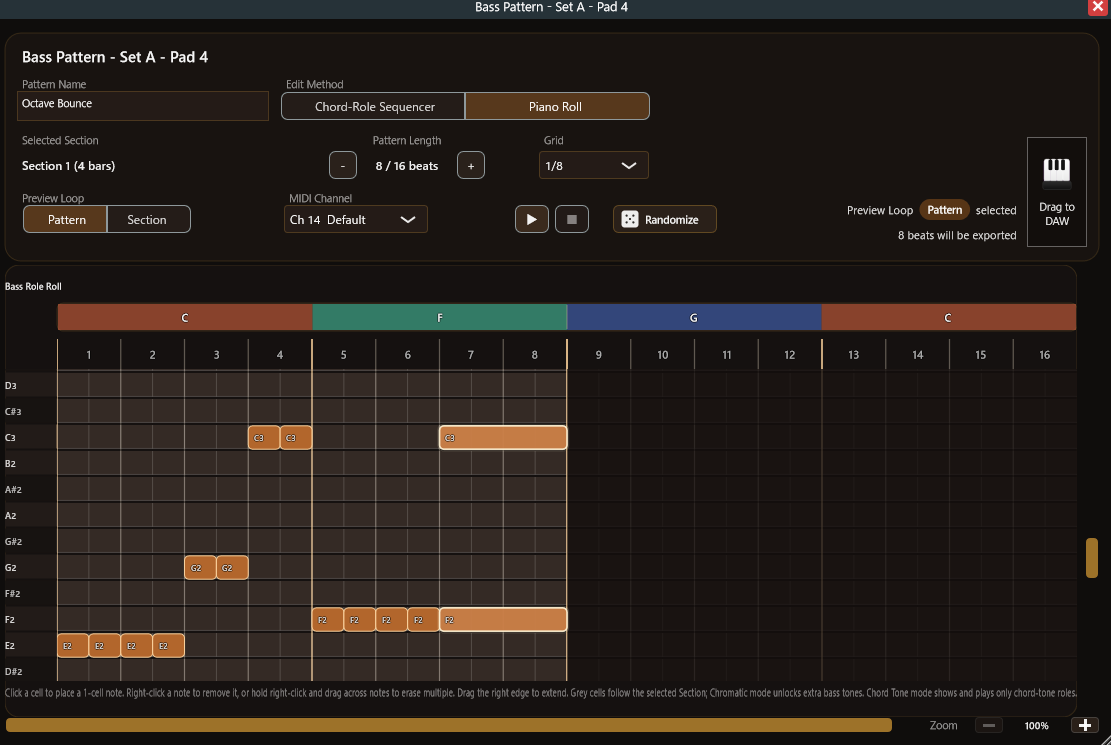
The Bass editor lets you choose one of two edit methods (pattern types). Switching rebuilds the pattern from scratch, so a confirmation dialog appears.
Chord-Role Sequencer
- a sequencer whose vertical axis is "role relative to the chord". Rows run from Root, 3rd, 5th … Octave from the bottom up, and also cover 11th / 13th / SlashBass
- the same pattern reused on a section with a different chord progression is re-read into the correct notes for each chord
Role Mode:Chord Tone(only chord tones can be entered; non-chord-tone cells are blocked) /Chromatic(free entry by semitone)- a long note that crosses a chord boundary keeps the actual pitch decided by the chord at its start
MIDI Roll (piano roll)
- a DAW-like piano roll entered by absolute pitch
- supports note move, duplicate-drag, multi-select (marquee), group move / resize, and copy / cut / paste / duplicate. Pasting where it does not fit shows a failure banner
Edit Range(low / high, off to +3oct) widens the pitch range you can view and enter, above or below. When you narrow the range and notes fall outside it, a delete confirmation appears
15.9 Arp / Chord Pad Editors
Arp and Chord Pad use the same role-lane editor as Bass. The main differences are:
- Arp and Chord Pad handle only the chord tones within the section's chords (chord-tone fixed)
- Arp ships with defaults and presets aimed at broken-chord phrases; Chord Pad at sustained / rhythmic chord voicings
Because they are built on role lanes just like Bass, patterns carry over even when the chord progression changes.
15.10 Presets and Drag Export
Each editor's Preset menu recalls per-part style templates. After recall, you can edit them freely as normal patterns.
From the drag area in the editor, you can drag a pattern into the DAW as MIDI. The exported range follows the Preview Loop selection (section / pattern), and the export content is shown on screen.
In the demo, drag export and Arranger MIDI export are not available (Section 15.2).
16. Arranger Mode: Performing
16.1 Section Launcher

The Section Launcher below the timeline lays out sections in 8 slots.
- reserve a section's playback with a click, a PC number key 1–8 (numpad works too), or a MIDI note
- slots can be reordered by dragging (the right-click menu also offers "move left / move right / to first / to last"). The order is saved with the project
- sections that fail the bar-boundary condition (Section 8.5) appear grayed out and cannot be selected or performed
Number keys with Ctrl / Cmd / Alt are ignored. If your DAW intercepts a number key before the plugin, launcher handling for that key cannot be guaranteed.
16.2 Current / Queued (Reservation-Based Switching)

Performance in Arranger Mode is reservation-based. Pressing a section or pad does not switch immediately; it is first reserved as "queued" and switches at the timing you set.
- the middle panel's
Current/Queuedcards show the playing section and the reserved section (with section color) - pad display: playing = highlighted, queued = dimly highlighted
- while the DAW is stopped, switching is not reservation-based; pressing a pad auditions immediately (looping by pattern length). Pressing the same pad again stops it
- clicking the current pad again during playback stops that part's playback. Stopping does not clear an already queued pad; it still launches on schedule
16.3 Launch Quantize
Launch Quantize decides when a section reservation is confirmed.
Next Bar: switch at the next downbeatSection End: play the current section to the end, then switch
Change it from the Launch chip in the middle panel, or from the Run Settings menu.
16.4 Sync Mode (Host / Plugin)
Sync Mode decides who manages the song position.
Host: fully follows the DAW playback position. If the DAW loops a short region, Chord Dock repeats the same region too. Suited to workflows where the whole song lives on the DAW timelinePlugin: receives only playback / tempo from the DAW, and manages section progression inside Chord Dock. Even when the DAW loops a short region, you can move the song forward (Verse → Chorus → …) with pad actions. Suited to live performance and structure sketching
During Plugin progression, the timeline playhead reflects the internal progression position.
16.5 Pad Switching (Timing / Playback Position)
Switching pads (patterns) within the same part is governed by two settings.
Timing — when to switch:
Next Bar: switch at the next downbeatPattern End: play the current pattern to the end, then switch
Playback position — where to start after switching:
Bar Lock: switch while keeping the bar position within the section (e.g. switching on bar 4 makes the new pattern sound from the same bar position)Restart: treat the switch point as the head and play the pattern from the beginning
16.6 Auto Advance
With Auto enabled, the accompaniment advances on its own without holding down pads. Section and Pad are independent toggles, so you can choose either one, both, or neither.
Section: when the current section reaches its end, the next section on the timeline is reserved and advanced automatically. A manual reservation takes priorityPad: when the current pattern reaches its end, the next assigned pad in the same part is reserved automatically. Build pads in order and the pattern unfolds on its own
Auto reservations are cleared when the DAW stops.
16.7 MIDI Trigger (Input and Note Map)
The Section Launcher and pads can also be operated with MIDI notes, for performing from an external keyboard or pad controller.
MIDIchip (input): choose the input channel monitored for triggers.Omni(default) responds to all channels- trigger notes are signals to call up pads and are never passed through as sounding notes
Trigger note assignments:
- Section Launcher Slot 1–8:
C0 D0 E0 F0 G0 A0 B0 A#0(note numbers 12, 14, 16, 17, 19, 21, 23, 22) - Drums Pad 1–8:
C1–B1+A#1(24, 26, 28, 29, 31, 33, 35, 34) - Bass Pad 1–8:
C2–B2+A#2(36, 38, 40, 41, 43, 45, 47, 46) - Arp Pad 1–8:
C3–B3+A#3(48, 50, 52, 53, 55, 57, 59, 58) - Chord Pad Pad 1–8:
C4–B4+A#4(60, 62, 64, 65, 67, 69, 71, 70)
Note names use "note number 60 = C4". Some DAWs display the same note number one octave off (60 = C3), so we recommend checking by note number.
16.8 Performance Page
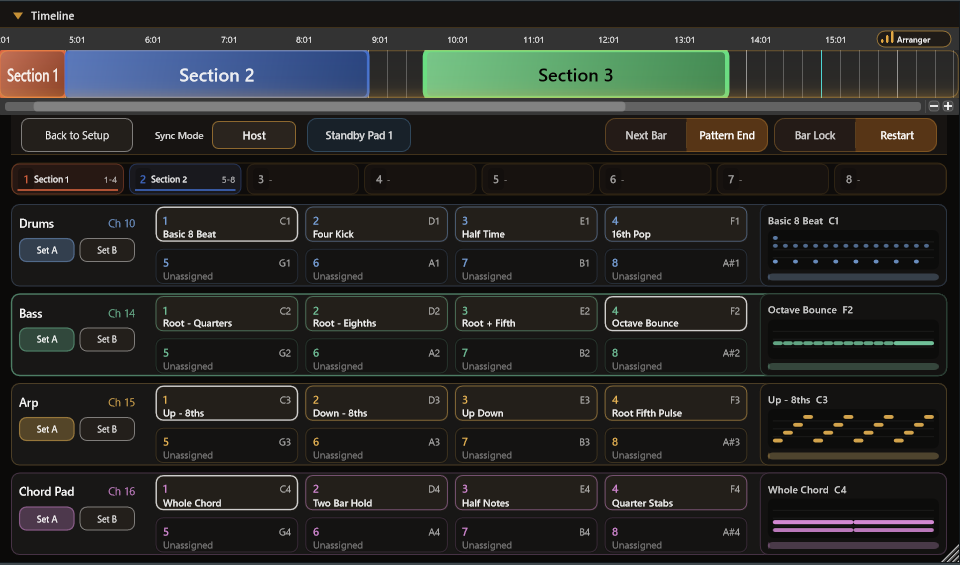
The Performance page, opened with Perform, is the screen for focused playing.
- shows 4 parts × 8 pads = 32 pads at once
- each part row shows the part name, MIDI channel, and
Set A / Set Bon the left, and the assigned pattern on the right - a compact timeline at the top keeps you oriented in the song
- the Section Launcher, number keys, and MIDI triggers all work on this page
- return to the Setup page with
Back to Setupor Esc
16.9 Song Page
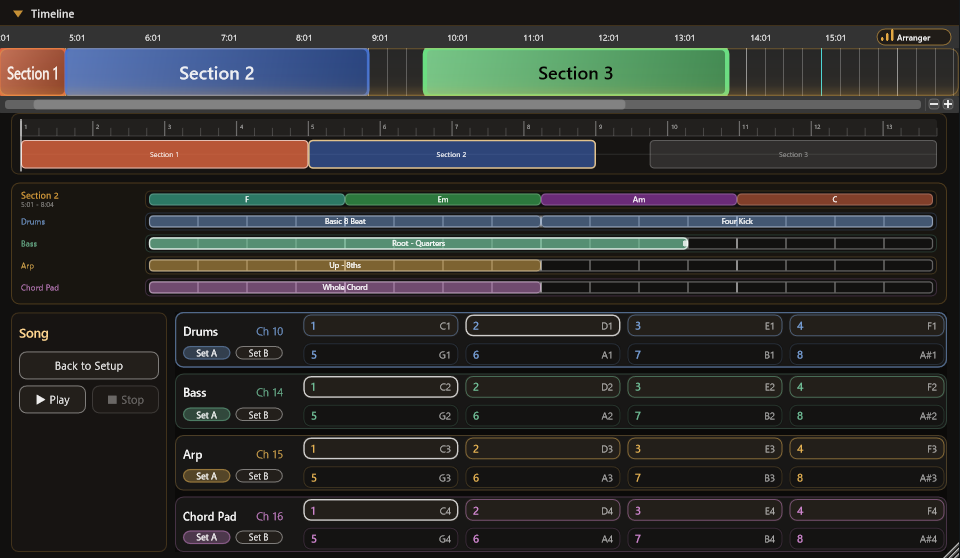
On the Song page, opened with Song, you lay out pad patterns along the song order and build "which pattern sounds in which section" on a single screen.
Screen layout:
- top: a full-song overview (the section order on the timeline becomes the song order)
- middle: the section's chord display and four lanes for Drums / Bass / Arp / Chord Pad (the pad-clip placement area)
- bottom: the pad list (here it is not for performing, but the source of patterns to place)
Editing pad clips:
- select a pad at the bottom and click the corresponding part lane to place it, or drag and drop from a pad to a lane
- drag a clip to move it, drag its right edge to change length, Delete / Backspace to remove, right-click menu to duplicate / delete
- clips do not overlap within a lane (length is adjusted automatically to fit the gap)
- placement / move / resize / duplicate / delete can all be undone and redone
Playback:
- while the DAW is stopped, use the header Play / Stop to preview the Song layout internally. Play after Stop resumes from the stopped position
- while the DAW is playing, the Song layout sounds automatically along the host playback position (the header Play is disabled during this)
- Song playback does not loop. It is intended for checking the song through from the top
16.10 Save / Recall and Undo
- pad assignments, pattern content, pattern set selection, launcher order, Song page layout, and performance settings such as sync mode are all saved and restored with the DAW project
- pad assignment changes, pattern edits, and Song clip edits are undoable
- transient performance operations (reservations, playback position) are not undoable and not saved. When you reopen the project, it starts from a stopped state
17. ChordPart — Bundled MIDI Receiver
17.1 When to Use It
Chord Dock outputs the four Arranger parts on separate MIDI channels, but some DAWs cannot wire "the plugin's MIDI output split by channel and sent to instruments on other tracks" (a well-known example is Ableton Live).
ChordPart is a small plugin that works around this limitation. It receives per-part MIDI directly from the Chord Dock main plugin and passes it out as the MIDI output of the track it sits on. This lets you use each part as a normal MIDI track entry point, and drive any instrument — including the DAW's built-in instruments — per part.
- if real-time performance is not needed, you can instead create per-part tracks with MIDI drag / export
- if your DAW has MIDI routing with a channel filter, you can split parts without ChordPart
17.2 How It Works and Latency
The main plugin and ChordPart are linked by an internal bus that does not pass through the DAW's track wiring. As long as both are loaded in the same DAW project, they connect with no extra wiring.
- the added latency is at most one audio buffer, and the amount is constant (no jitter)
- the recommended buffer size is 128–256 samples. Within this range, the offset from the main plugin's direct sound stays in a practically unnoticeable range (about 3–6 ms)
- 512 samples also works, but is not recommended, since the offset can reach about 11 ms in some cases
17.3 Setup Steps
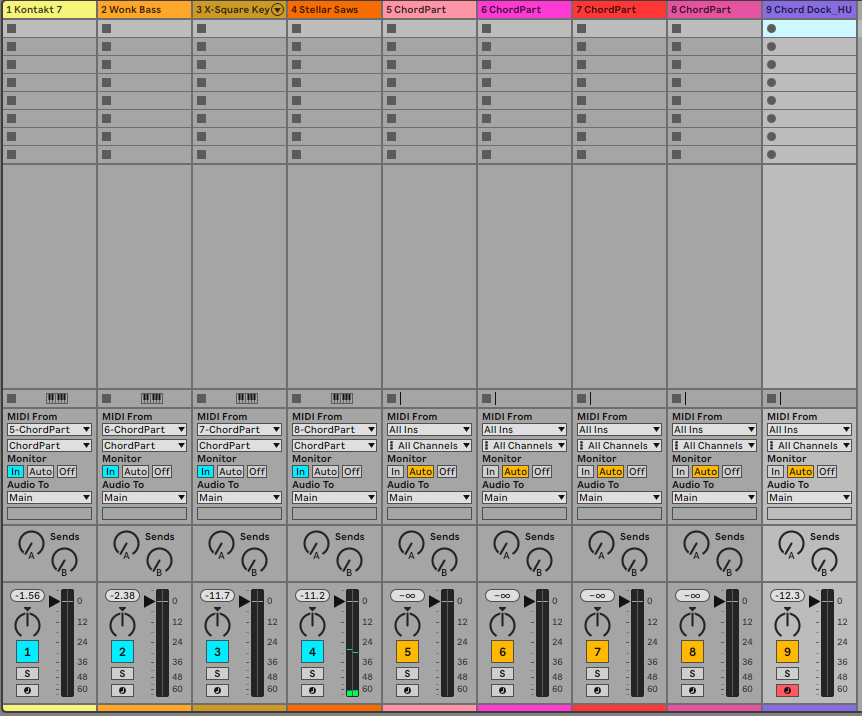
Basic steps using Ableton Live 12 as an example (the idea is the same on other DAWs).
- Insert the Chord Dock main plugin on Track A, and click the
Part Sendchip in the middle panel to turn it on (theSend to ChordPartitem in theRun Settingsmenu does the same). - Insert one ChordPart on each of Tracks B1–B4, and set each instance's
Partto Drums / Bass / Arp / Chord Pad. - Place any instrument (Live's built-in instruments are fine) on instrument tracks C1–C4, set
MIDI Fromto the corresponding B track (ChordPart), and setMonitor = In. - When you perform in Arranger Mode, each part sounds on its corresponding instrument track.
- Arm and record the C tracks to capture per-part MIDI clips.
You can set up only the parts you use (for example, just Drums and Bass).
17.4 The ChordPart Window
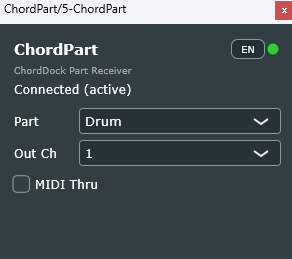
ChordPart is a compact single-screen plugin (full name: ChordDock Part Receiver).
Part: the part to receive (Drums / Bass / Arp / Chord Pad)Out Ch: the MIDI channel output to this track (1–16, default 1)MIDI Thru: when on, mixes MIDI arriving at this track from the host into the part output (default off)- status:
Not connected/Connected (idle)/Connected (active)/Engine stopped/Version mismatch. The indicator blinks while receiving - the EN / JA button on the title row switches the display language (initially auto-detected from the OS language)
All of these settings are saved with the DAW project.
17.5 Status on the Main Plugin

The Part Send chip in the main plugin's middle panel toggles sending on click, and also shows status with color and text.
OFF(neutral): not sendingWaiting(gold): another Chord Dock instance is using the bus, so this one is waitingSending(green): sending per-part MIDICh conflict!(red): multiple parts are set to the same MIDI channel. Those parts cannot be distinguished, so separate the channels (a toast warning also appears)Version mismatch!(red): the main plugin and ChordPart versions do not match. Update both to the same version
The Run Settings menu has the same toggle and status line.
17.6 Notes and Limitations
- make sure the parts (and the main plugin's chord-track playback) do not share the same MIDI channel. With the defaults (10 / 14 / 15 / 16), there is no overlap
- the same part can be received by multiple ChordPart instances (for layering)
- if two or more Chord Dock main plugins are placed in the same project, only the one that started sending first can send. The others show "Waiting"
- use ChordPart within the same DAW project as the main plugin. Separately launched DAWs do not connect
- when performing live in real time, the offset is practically unnoticeable at the recommended buffer size (128–256 samples — see Section 17.2). The offset only matters when you record the performance in the DAW in real time; in that case it is captured shifted back by a constant amount (at most one buffer)
- to capture the timing precisely, drag the pattern in from the pattern editor's drag export instead of recording in real time (this method introduces no offset at all). If an already-recorded offset bothers you, the amount is constant, so you can fix it by shifting all notes forward at once or by quantizing (for material with fine placement such as rolls or swing, shifting all notes at once is recommended)
18. MIDI Export and Drag Workflow
Chord Dock supports several export workflows:
- export the whole timeline progression
- drag chord-derived MIDI material into the DAW
- drag Arpeggio / Bassline generated notes
- drag Reharmo-generated preview notes
- drag a pattern from the Arranger pattern editor (Section 15.10)
The exact drag targets available depend on the current mode.
19. Licensing and Editions
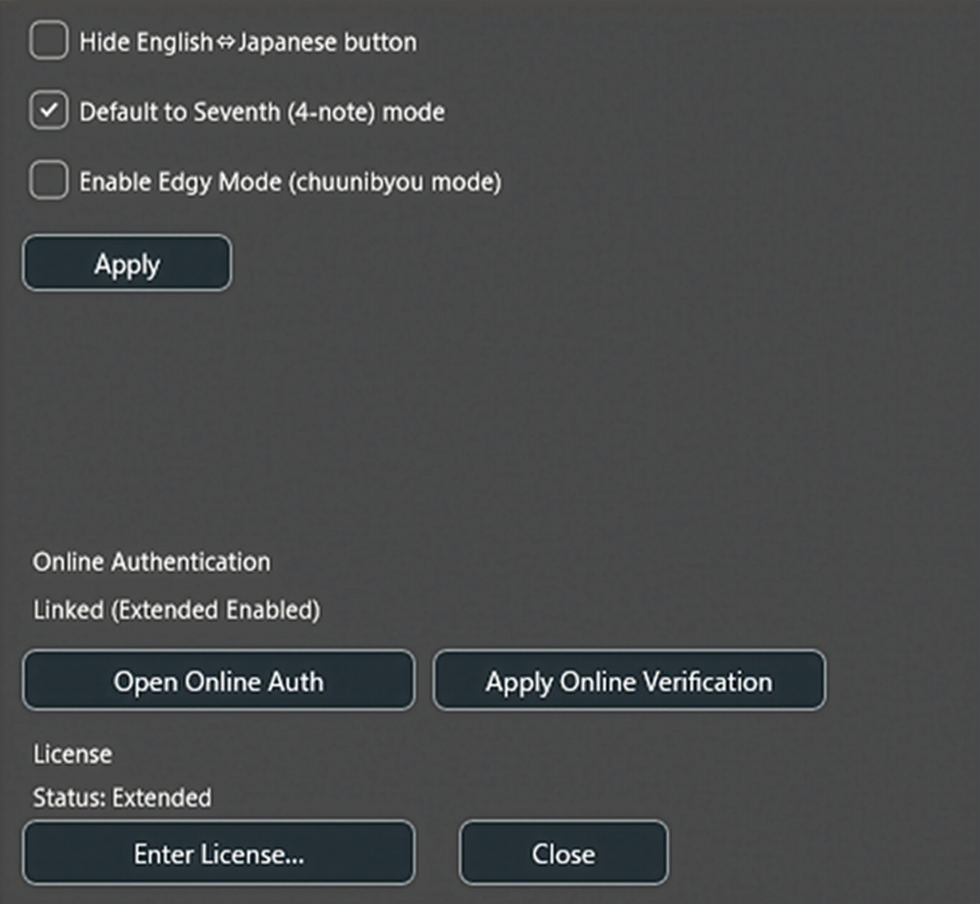
19.1 Edition Lineup
Chord Dock comes in three editions:
- Lite: the base edition, ideal for creating chord progressions
- Extended: an edition for expanding harmony, with tensions, slash chords, the Circle of Fifths, and reharmonization
- Performance: an edition for performance, accompaniment, and live operation, centered on Arranger Mode
| Feature | Lite | Extended | Performance |
|---|---|---|---|
| Timeline chord editing / Sections | ✔ | ✔ | ✔ |
| Chord progression MIDI export / progression presets | ✔ | ✔ | ✔ |
| 9th-notation chords (add9 / M9 / m9 / 7(9)) | ✔ | ✔ | ✔ |
| Tension menu (9 / b9 / #9 / 11 / 13) | — | ✔ | — |
| Slash chords / aug / b5 / 6th | — | ✔ | — |
| Circle of Fifths | — | ✔ | — |
| Extended snap / extended length | — | ✔ | ✔ |
| User preset bank | — | ✔ | — |
| Arpeggio / Bassline generation (incl. note editing) | — | ✔ | ✔ |
| Reharmonization | — | ✔ | — |
| Arranger Mode (pad performance / Perform / Song) | — | — | ✔ |
| Per-part MIDI output via ChordPart | — | — | ✔ |
About Full Bundle: a bundle that includes both Extended and Performance. Its features are the union of both editions (everything marked ✔ under Extended or Performance is available).
Arranger Mode Demo: Lite and Extended can try Arranger Mode as a demo — 90 seconds of actual playback total, Pad 1–3 per part, and no MIDI export. See Section 15.2 for details.
Depending on the edition and license state, features outside your edition appear locked or disabled.
19.2 Activation Flow
- Open Settings.
- Enter your serial key.
- Complete browser-based online activation if required.
- Return to the plugin and let it refresh license status.
ChordPart itself has no license operation (it follows the main plugin's edition).
19.3 If Activation Does Not Refresh
- reopen Settings
- use the online verification refresh option if provided
- confirm the browser-side registration completed successfully
An internet connection is required for initial activation.
20. FAQ / Troubleshooting
20.1 The plugin does not appear in my DAW
Check the following:
- Installation completed successfully.
- On Windows, the
.vst3files (both the main plugin and ChordPart) were copied into the correct folder. - Your DAW has rescanned plugins.
20.2 I hear no sound
Check:
- MIDI routing
- target instrument assignment
- track mute / solo
- audio device settings in the DAW
- Chord Dock's internal preview audio toggle if you expect onboard preview sound
20.3 I cannot edit inside a section
You may still be in normal section mode. Enter Focus Edit Mode by double-clicking the section.
20.4 Part of the timeline is grayed out
You are likely in Focus Edit Mode or another mode that intentionally narrows the editable range.
20.5 Reharmo does not load my section
Check section length. Reharmo only accepts sections up to 16 bars.
20.6 Arpeggio / Reharmo / Arranger controls look disabled
That usually means the feature is not unlocked for your edition or license (Chapter 19). Arpeggio is Extended / Performance, Reharmo is Extended, and Arranger Mode is a Performance feature.
20.7 I cannot select a section in Arranger / the launcher is grayed out
That section probably does not meet the bar-boundary condition. Sections used in Arranger Mode must start on a bar line and end on a bar line (at least one bar). Align the start and end to bar boundaries on the timeline.
20.8 Pressing a pad does not switch immediately
This is by design. Switching in Arranger Mode is reservation-based and waits until the position set by Launch Quantize (section) or Timing (pad) before switching. The queued pad is shown dimly highlighted. If you want an immediate switch, set it to Next Bar.
20.9 The Arranger accompaniment does not sound when I play the DAW
No pad may be chosen to sound at the moment playback starts. Check the following:
- Whether the pad has an assigned pattern.
- Whether a pad is on standby. Before playback, use
Standby Pad 1to put Pad 1 of each part on standby together, or press a pad to reserve it before playing. To put a pad other than Pad 1 on standby, chooseSet to Standbyfrom that pad's right-click menu. - Whether routing to the DAW tracks is correct. For MIDI routing to instrument tracks and receiving-instrument settings, see 20.2 "I hear no sound". If you use ChordPart, also check Chapter 17.
20.10 The Song page Play button is disabled
While the DAW is playing, Song internal playback is unavailable (it switches to sounding the Song layout along the host position). Stop the DAW, then press Play.
20.11 ChordPart stays "Not connected"
Check the following:
- Whether the Chord Dock main plugin is loaded in the same DAW project.
- Whether the main plugin's
Part Sendchip is on (Sending). - Whether the main plugin and ChordPart versions match.
20.12 Sound through ChordPart is offset
When performing live, the offset is practically unnoticeable with an audio buffer size of 128–256 samples (Section 17.2). A recorded MIDI offset is constant, so it can be aligned by shifting all notes at once or by quantizing. To capture the timing precisely, use the pattern editor's drag export instead of real-time recording (Section 17.6).
20.13 It shows "Version mismatch"
The main plugin and ChordPart versions differ. Sending / receiving is stopped for safety. Update both plugins as a matching-version set.
20.14 I cannot use Arranger Pad 4–8
If your edition runs as Arranger Mode Demo, each part can only use Pad 1–3. Pad 4–8 are shown but cannot be used (this is not a bug). Performance or Full Bundle is required to use all pads (Section 15.2).
20.15 Arranger stopped responding / it says the demo has ended
When Arranger Mode Demo uses up its playback time (90 seconds total), Arranger playback, triggering, editing, and MIDI output are locked. The remaining demo time is not saved with the project, so reopening the DAW project or re-inserting the plugin resets it to 90 seconds. Performance or Full Bundle is required to use it without limits.
20.16 Are Bass, Arp, and Chord Pad patterns AI-generated or random?
No. Arranger Mode does not use AI generation, cloud-based generation, or purely random playback. Presets and randomize commands can create starting points, but the pattern itself remains an editable pad pattern.
For Bass / Arp / Chord Pad, the generated MIDI notes come from the selected section's chord progression plus the pattern's timing and chord-role settings. This means the same pattern can follow different chord progressions while keeping its musical shape.
21. Support / Contact
For release notes, downloads, product information, tutorial videos, and support information, please refer to the official landing page and YouTube channel.
- Official landing page: https://k2get.github.io/chord-dock-site/index.en.html
- YouTube channel: https://www.youtube.com/@k2get
For support or pre-sales questions, please use the contact form linked from the official landing page.